Building a Login Flow with .NET MAUI

Let's build a Login Flow with .NET MAUI with Shell.


Authentication in any mobile app is very common. Lets get started with this. Its obvious that it should ask for login only if it isn't authenticated. We will check for authentication , if not there we will move to Login page if login is success we will move to the Home page. For this example we will override the backbutton pressed event to quit the application but you can customize accordingly as per your need.

For this post I am using a simple authentication but you can use JWT or any method you want. 

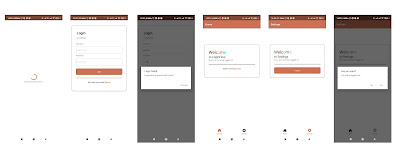
Here is the example of the login flow:


All the pages that has to be used needs  to be registered with the Shell.

If you are a bit familier with the Shell navigation the first content page is the one which is displayed after startup. So we need to structure the shell accordingly in order.

The pages we are using here for the example:

  1. LoadingPage
  2. LoginPage
  3. HomePage
  4. SettingsPage

Here is the AppShell.xaml

<?xml version="1.0" encoding="UTF-8" ?>
<Shell
    x:Class="LoginFlow.AppShell"
    xmlns="http://schemas.microsoft.com/dotnet/2021/maui"
    xmlns:x="http://schemas.microsoft.com/winfx/2009/xaml"
    xmlns:local="clr-namespace:LoginFlow"
    xmlns:views="clr-namespace:LoginFlow.Views"
    Shell.FlyoutBehavior="Disabled">

    <!--Loading Page-->
    <ShellContent
        Title="Home"
        ContentTemplate="{DataTemplate views:LoadingPage}"
        Route="loading" />

    <!--Login Page-->
    <ShellContent 
        Title="Login" 
        ContentTemplate="{DataTemplate views:LoginPage}"
        Route="login"/>
    <!--Main Page-->
    <TabBar>
        <Tab Title="Home" Icon="house_door_fill.svg">
            <ShellContent
                Icon="house_door_fill.svg"
        Title="Home"
        ContentTemplate="{DataTemplate views:HomePage}"
        Route="home" />

        </Tab>
        <Tab Title="Settings" Icon="gear_fill.svg">
            <ShellContent
                Icon="house_door_fill.svg"
        Title="Settings"
        ContentTemplate="{DataTemplate views:SettingsPage}"
        Route="settings" />
        </Tab>
    </TabBar>

</Shell>

Register all the routes:

public partial class AppShell : Shell
{
    public AppShell()
    {
        InitializeComponent();
        //Register all routes
        Routing.RegisterRoute("login", typeof(LoginPage));
        Routing.RegisterRoute("main", typeof(MainPage));
        Routing.RegisterRoute("home", typeof(HomePage));
        Routing.RegisterRoute("settings", typeof(SettingsPage));
    }
}


The loading screen checks that if the user is authenticated or not. In this example we will check for a key in SecureStorage. If we found data for that key we will authenticate it and return true if not we will return false.
So we can override the OnNavigatedTo method to check if the app is authenticated not not. Here is the code which can be written in the page or in the view model.
 
protected override async void OnNavigatedTo(NavigatedToEventArgs args)
{
    if (await isAuthenticated())
    {
        await Shell.Current.GoToAsync("///home");
    }
    else
    {
        await Shell.Current.GoToAsync("login");
    }
    base.OnNavigatedTo(args);
}

async Task<bool> isAuthenticated()
{
    await Task.Delay(2000);
    var hasAuth = await SecureStorage.GetAsync("hasAuth");
    return !(hasAuth == null);
}

The back button pressed event

protected override bool OnBackButtonPressed()
{
   Application.Current.Quit();
   return true;
}

The Login page:


When the app isn't authenticated it goes to the LoginPage. I haven't placed any validation for the controls but it can be put. I have hardcoded the username and password to authenticate for simulating the login flow.

Here is the login page with one button and two entry controls for Username and Password.

Here is the click event:

private async void LoginButton_Clicked(object sender, EventArgs e)
{
    if (IsCredentialCorrect(Username.Text,Password.Text))
    {
        await SecureStorage.SetAsync("hasAuth", "true");
        await Shell.Current.GoToAsync("///home");
    }
    else
    {
        await DisplayAlert("Login failed", "Uusername or password if invalid", "Try again");
    }
}

If the username and password is correct the we can navigate to HomePage.

The Home Page:


The SettingsPage:


In the settings page we can implement the logout logic. In the log out button clicked we can write like this.

private async void LogoutButton_Clicked(object sender, EventArgs e)
{
    if (await DisplayAlert("Are you sure?", "You will be logged out.", "Yes", "No"))
    {
        SecureStorage.RemoveAll();
        await Shell.Current.GoToAsync("///login");
    }
}


Conclusion:

Its a very small example for building a login flow in .NET MAUI. You  can check out.the repository in GitHub.


Comments

  1. Hi, I am trying to implement your LoginFlow example in a Maui App I am developing. I undertand the code and logic and most is working. However I do have one problem with the line:
    await Shell.Current.GoToAsync("///home"); in particular the three forward slashes.
    When I run your code I do not get an error.
    However when I run the same code in my app I get the error:
    System.Exception: 'Global routes currently cannot be the only page on the stack, so absolute routing to global routes is not supported. For now, just navigate to: /mainPage'
    I want my MainPage to be the Shell root so I need to be able to use ///mainPage.
    An internet search acknowledges the issue and suggests work arounds but does not give a fix.
    My question is how does /// work in your code without raising an exception?
    Many thanks for your help.

    ReplyDelete

Post a Comment

Popular posts from this blog

Use SCSS with ASP.NET Core 5.x or 3.X

Generate PySpark Schema dynamically in Python from JSON Sample